Weave a beautiful napkin holder, which will become a wonderful and practical part of your kitchen equipment. We have a guide for weaving from rattan.
Instructions for weaving from rattan - napkin holder
Napkin holders, at least at family gatherings, are often an indispensable part of kitchen equipment. This is probably the most practical way to deal with the bulky napkins on the dining table when there is not enough space and every available space is valued in gold. Create your own practical wicker napkin holder - we'll show you how.
What do we need to weave?
1st step
.jpg)
We'll thread the first four warp rods through the base. We lead the first rod from the left behind – before and behind the next rods. From the right we set up another rod - this is how we continue around the bottom.
2nd step
.jpg)
Establishing the last two warps. For the comfortable placement of the last warp rods, it is advisable to release the first two warp rods in the weave; we also run the last warp behind – before and after.
3rd step
.jpg)
After entangling the last warp rod, reattach the loosened first warp rods by pulling in the direction of the arrows.
4th step
.jpg)
We set up 4 braiding rods and run the left rod before two and after two warps. Weave 3 rows this way.
5th step
.jpg)
Then double the warps on the longer side of the bottom (add another to each warp) and continue waeving.
6th step
.jpg)
4th and 5th rows on the longer sides of the bottom are bulged to a height of about 6cm (we can help ourselves by supporting the curved weave of the clothespin or by putting the drinking straw on the warp rods of the desired length – brace them).
7th step
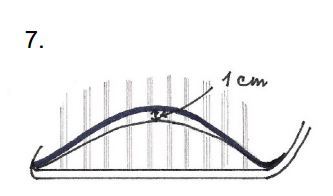
6th and 7th rows are arched 1 cm higher than previous rows.
8th step
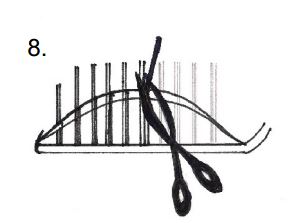
Then we cut the warp rods just above the braid, which we added to the longer sides.
9th step
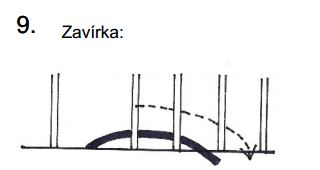
We lead the shutter by two warp rods and out.
10th step

11th step
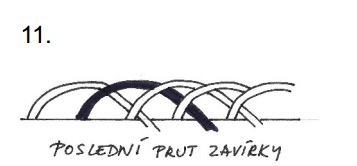
Finally, we clean the braid by cutting off the excess warp rods.
.jpg)