Simple instructions for weaving a bell from rattan. Make a beautiful decoration for Christmas or other holiday moments and create the necessary atmosphere.
Weaved bell from rattan
Bells are popular Christmas decorations in many homes and shops – they are well suited as decorations for door, windows or trees. Decorative bells also find their use during Easter and other occasions. If you don't want to buy the bell already finished, then you will certainly appreciate our detailed instructions, with which you can easily make it yourself. We wish you well-being.
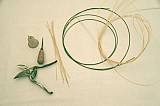
What will you need for making a bell
- 9 cm mould – rattan 2 – 2,25 mm 0,04 kg (for the fill we used rattan 2 mm natural and 2,25 mm dyed
- 6,2 cm mould - and 1,75 - 2 mm 0,03 kg
- 4,5 mould – rattan 1,5 – 1,75 mm 0,01 kg
- Mould
- Scissors
- Awl
Preparation for weaving
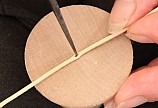
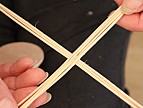
Cut the selected, prepared, natural rattan using scissors of the curriculum – ideally 8 pieces with a length of about 44 cm. Before creating, remember to soak the rattan in lukewarm water for 1 minute - it will soften and become more malleable.
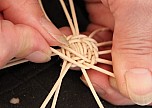
Take the outline rods (all 8 pieces) and fold them in half. Take your arrow in your hands and make holes in 4 rods. Then line up the rods using the arrow.
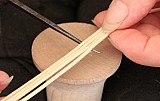
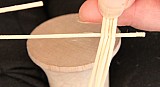
Then take the rods into which you have just dug a hole with a arrow, line them up in your fingers next to each other and drag the rod through them to the point of folding. Continue gradually with the remaining three rods. This way you create a cross that will form the main structural element of the decorative bell.
Weaving decorative bell step by step
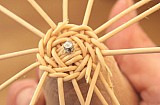
Turn the braided rod behind four warp bars.
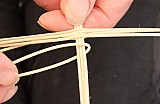
Next, we cross the weaved rod over the other four rods of the syllabus – this will gradually start to form the top of the bell.
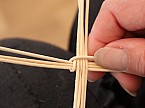
Gradually with this weaving we continue until the created cross is woven once in a complete circle. The next row is then knitted over two rods of the warp.
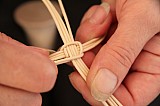
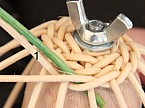
Třetí řadu opleťte stejně jako řadu první – pouze přes jednu osnovu. Tímto postupem se dostanete do fáze, kdy již máte vytvořený základ (vrch) pro formu.
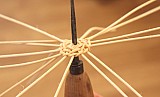
Pomocí šídla udělejte ve vytvořeném vrchu otvor, do kterého následně vsuneme formu, kterou poté přitáhneme kompatibilní matkou.
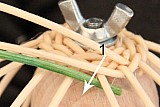
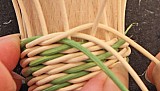
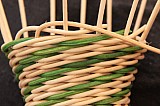
V pletení pokračujeme s pomocí barevných prutů (na Vánoce se hodí bílý nebo červený, na velikonoce zelený nebo oranžový). Barevný prut přidávejte za druhý osnovní prut od prutu prvního.
Prut č. 1 následně veďte přes dvě osnovy a podvlečte jej za jednou osnovou.
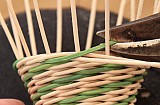
S pletením pokračujte až do výšky formy. Samotný výplet ustřihněte za prutem osnovy a následně přejděte na uzavírku.
Tu uděláte tak, že osnovní prut zahnete za vedlejší osnovní prut a protáhnete jej před dalším osnovním prutem. Osnovní prut poté ukončíme za třetím osnovním prutem. Tímto způsobem pokračujte celým okrajem zvonku dokola.
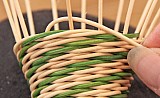
Poslední osnovní prut protáhněte prvním zahnutým osnovním prutem zezadu a poté zepředu dozadu. Potom stačí prut zastřihnout.

